Extending Copilot in Dynamics 365 Sales to Trigger Customer Insights JourneysIntroduction
In today’s dynamic sales and marketing environment, achieving seamless alignment between front-line sellers and marketing automation is essential for delivering timely and personalized customer experiences. Microsoft Dynamics 365 Copilot, when extended thoughtfully, becomes a powerful bridge between human intent and AI-powered orchestration. This blog explores how to enhance Copilot in Sales to trigger Customer Insights Journeys (CI-J) in real time based on sales context, enabling business users to drive automated engagement with minimal friction.By following the approach detailed here, sales teams can initiate targeted marketing engagements simply through natural language prompts, streamlining operations, reducing errors, and enhancing responsiveness.Business Scenario: Invite Contacts to Marketing Events
Business Context: Contoso organizes strategic high-profile marketing events, sales teams manually submit spreadsheets listing invitees to marketing, which then uploaded into Dynamics Customer Insights Journey for event management. This process is inefficient, error-prone, and delays engagement.
Solution: With extended Copilot in Dynamics 365 Sales capabilities:
- Sales reps issue a simple Copilot prompt to invite a contact.
- Backend automations immediately handles record creation and personalized email invitations.
- Marketing teams no longer need to intervene manually, significantly enhancing operational efficiency.
Key Benefits- Immediate personalized communication.
- Reduced manual workloads and error rates.
- Streamlined collaboration between sales and marketing operations.
Solution Architecture Overview
The solution leverages these components in Dynamics 365 and Microsoft Power Platform ecosystem:- Dynamics 365 Sales Hub: Interface where sellers manage contacts.
- Dynamics 365 Customer Insights – Journeys (CI-J): User interface of creation of orchestration flows.
- Copilot in Dynamics 365 Sales Agent: AI assistant in Dynamics 365 Sales that helps sales teams be more productive and efficient in their daily work.
- Custom Topic for Copilot in Sales Agent: Extension to Copilot in Sales
- Dataverse Tables: Store event invite data.
- Power Automate Flows: Provide automation access to data within Dataverse
- Microsoft Copilot Studio: Configuration of and extension of Copilot agents and topics.
Implementation
Part 1: Dataverse Configuration
The first step is to create an invite list table. This table will serve to hold the contacts that should be invited to the event.- Access Dataverse Tables:
- Navigate to https://make.powerapps.com
- Select your Dynamics 365 environment.
- Click on Tables → + New table → Table (advanced properties).
- Display Name: Invite List
- Add additional columns if necessary
- Publish the Table
Next we create a relationship between Invite List and Event. This will allow us to easily locate the list or lists that hold the individuals invited to an event.
On the Invite list entity, navigate to Relationships under the Schema section.
- Create Relationship: Click +New relationship:
- Type: Many-to-one
- Related table: Event
- Click Done and Publish
To facilitate the data entry of new Invite Lists, we want to tweak the data entry form. From the entity configuration, navigate to Forms form the Data experiences section and open the main Information form.
- Drag the Event field from the column list onto the form canvas.
- Clearly label this field as Event Information for easy identification by users.
- Save and Publish: Click Save and Publish the form.
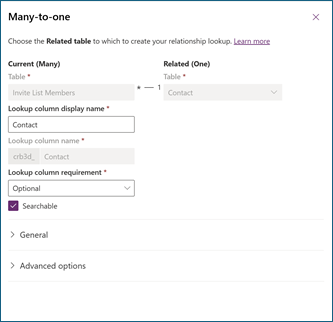
Next we create an “Invite List Members” table, which will be an intersection table between the newly created Invite List and Contact, representing the list of Contacts that are part of a given list.
- In the maker portal, navigate to Tables and create New Table:
- Click + New table → Table (advanced properties)
- Display Name: Invite List Members.
- Add Relationships to the Invite List and Contact tables
- Select the Invite List Members table. Go to Relationships and create
- New Relationship with "Contact":
- Type: Many-to-one
- Related table: Contact.
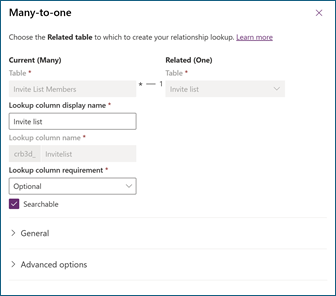
- New Relationship with "Invite List"
- Type: Many-to-one
- Related table: Invite List
- Click Publish to finalize.
Finally, we add the new tables to the Customer Insights – Journeys App so marketers are able to create lists and link them to their events.- On the maker portal, navigate to Apps. Find the Customer Insights – Journeys application and click on Edit.
- Add "Invite List" Table to Navigation:
- Under Event Planning, click + Add new page and select Dataverse table.
- Choose Invite List table, ensure "Show in navigation" is checked.
- Place this in the Event Registration area.
- Click Save.
- Add "Invite List Members" table. Because we are not intending to add invite list members outside the context of the parent invite list, we don’t need to add them to the navigation.
- Repeat steps for adding a new Dataverse table page.
- Select Invite List Members, ensure "Show in navigation" is not checked (hidden from navigation).
- Click Save.
- Click Publish
Part 2: Dynamics 365 Customer Insights Journeys Setup
Configure CI-J Triggers, Events and JourneysNow that we have the data model in place to support the invite lists, we will create the appropriate journey to automate the sending of invitations when someone is added to the invite list.- Create a new CI-J trigger (Add Contact to List) configured to activate upon record creation in Invite List Members.
- Create a Customer Insights Journey email that will send a personalized invitation to the contact for the event. Some of the key inputs to consider are:
- Personalization fields
- Event Name – obtained from the trigger input
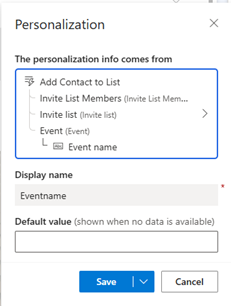
- Contact First Name
- Subject, for example "You're invited to {Event Name}"
- Enter compliance settings
- Save and mark Ready to Send
- Create a trigger-based journeys that will start when the trigger created in step 1 above is fired.
- Journey Name: Event Invitation Journey
- Type: Trigger-based
- Trigger: Add Contact to List
- Add step: Send Event Invitation email
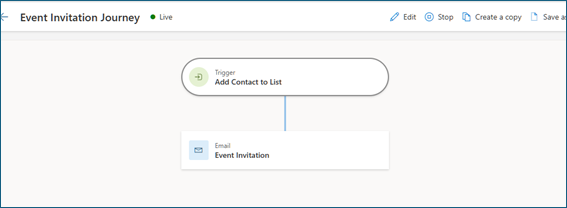
- Save and publish
- Navigate to Event planning and create and publish events. For more information on event planning, see the documentation Plan, publicize, and collect registrations for events - Dynamics 365 Customer Insights | Microsoft Learn. For the purpose of the test, we are creating 2 sample events (e.g., Copilot In A Day 1 & Copilot In A Day 2).
- Create Invite Lists for the previously created events. Now that we have the events, we create the invite lists that will hold the members for the corresponding event. Each list will be related to an Event.
Part 3: Copilot Studio Configuration
Now that the D365 Customer Insights Journey and Sales configuration is ready, it’s time to extend the functionality of Copilot in Sales to allow for sellers to add contacts to an event.- Navigate to Copilot Studio (https://copilotstudio.microsoft.com/) and select your Dynamics 365 environment. Open the Sales Copilot Virtual Agents Bot
- Create a New Topic by selecting Topics in the navigational tabs and clicking the “Add a Topic” button and starting from blank. Give the topic a name.
- On the Trigger tile, enter trigger phrases such as:
- "Invite to event"
- "Add contact to event"
- "Register contact for event"
- Initialize a Variable to Store Contact ID, selecting Variable management → Set a variable value. Create a new string variable:
- Name: ContactContextId
- Default value: null
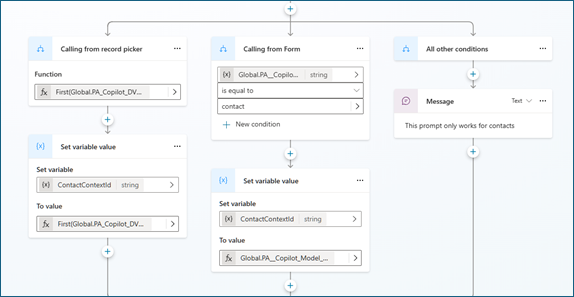
- Because we want to allow sellers to choose the contact to add from the form and also from anywhere in the Sales Hub application, we need to account for different contexts so we add a Condition.
On the first branch we will handle selection form the Copilot record picker (Use Copilot chat in model-driven apps - Power Apps | Microsoft Learn). - Add a Condition node titled "Calling from Record Picker".
- Use this formula to detect the record picker context: First(Global.PA_Copilot_DVRecordContext).EntityName = "contact"
- Then we set the value of the contacted based on the selected record in the record picker by setting the ContactContextId variable to First(Global.PA_Copilot_DVRecordContext).RecordId
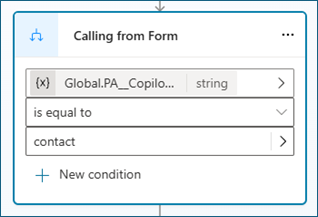
- We now want to add a second conditional branch to handle the scenario where the topic is called from the Contact Form.
- Insert a new condition and confirm it is being called from a contact form. We do this by comparing the existing variable “Global.PA__Copilot_Model_PageContext.pageContext.entityTypeName” to the string “contact”
- For this branch we set the value of the ContactContextId variable to the value of the Contact Id, identified by “Global.PA__Copilot_Model_PageContext.pageContext.id.guid”
- To account for scenarios where the trigger phrase was called from a form that is not the contact, we push a message to all other conditions. After all three branches are configured, we have something similar to this.
- As a next step, our agent will retrieve the available events to allow the seller to select the event to which the contact should be invited. To do this, the agent will leverage an Action in Power Automate.
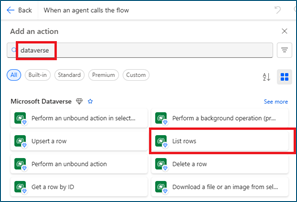
- Add a Tool (previously called Action) and click on “New Agent flow”. This will open the Flow designer
- In the Flow, the trigger will be “Agent calls the flow”
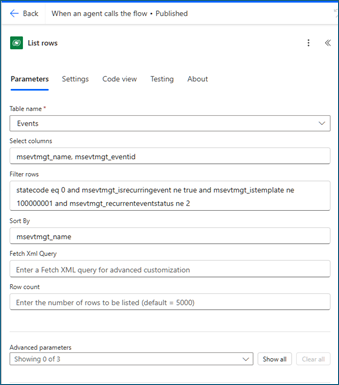
- Add a List Rows from Dataverse action
- Select the Event entity, filtering to show only active, non-recurring, non-template events and select the msevtmgt_name and msevtmgt_eventid columns
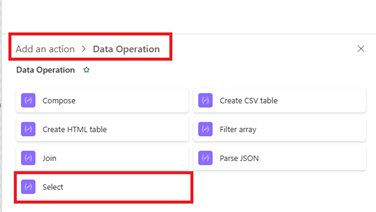
- Add a new action under List rows : Data operation > Select
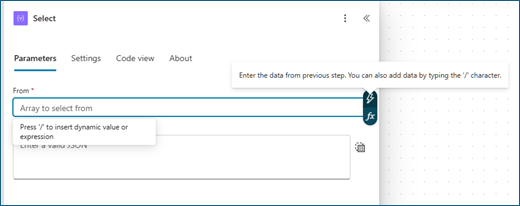
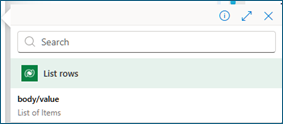
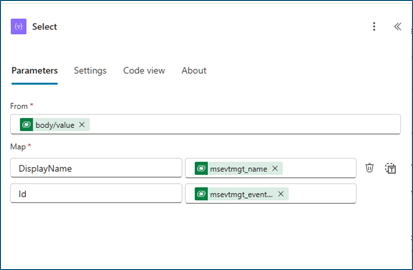
- In the Select operation, pick the From value from the previous step, selecting body/value from the Dataverse List Rows step
- Add two records to the map
- DisplayName: msevtmgt_name
- Id: Event: msevtmgt_eventid
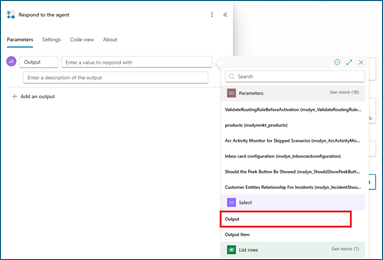
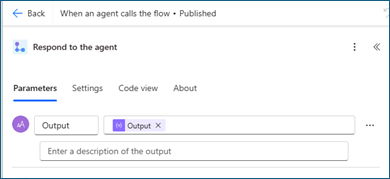
- Update “Respond to the agent” action
- Add an output > Text
- Name: Output
- Enter a value to respond with: output from the select step
-
-
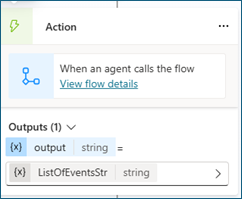
- Back in Copilot Studio, store the output of the flow in a new string variable ListOfEventsStr.
- The output received from the Flow will need to be parsed in order to present to the user for selection. Add a Parse value tile in Copilot Studio with the following parameters
- Parse Value: ListOfEventsStr
- Data Type: Table
- Save As: ListOfEventsTbl (new variable of type table)
- Edit the Schema to the following:
- kind: Table
- properties:
- DisplayName: String
- Id: String
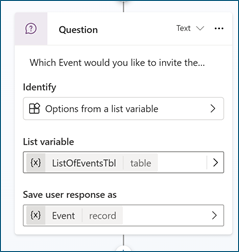
- Prompt the seller to select an event from the list by pushing the parsed table as a question. To do this, add a new Question tile, with the following variables:
- Identify: Options from a list variable
- List variable: ListOfEventsTbl
- Save user response as: Event (new variable of type record)
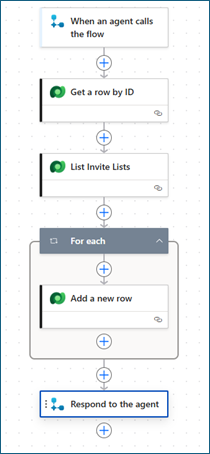
- Using Power Automate Flow, the Agent will now add the Contact to the invite list. Create another Power Automate flow tile. This flow will also trigger on when the Agent calls the flow.
- Add two inputs to the flow ContactId and EventId
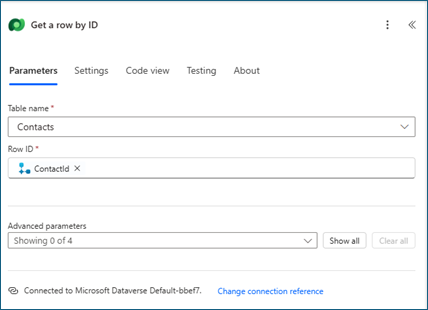
- Add a step to Get row by ID from a Dataverse table. Specify the Contacts table and pass the ContactId parameter received as input.
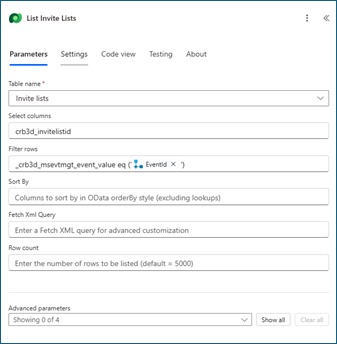
- Use the List Rows action to retrieve the Invite List records for the selected event.
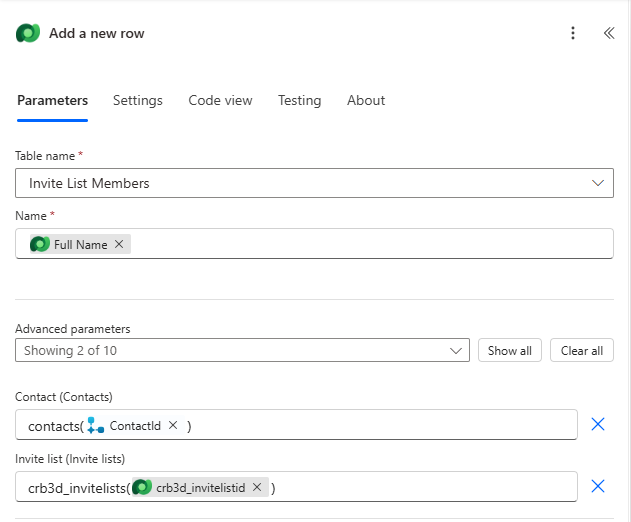
- Use the Add a new Row to Dataverse table action to create a new invite list member, linking the contact and the invite list.
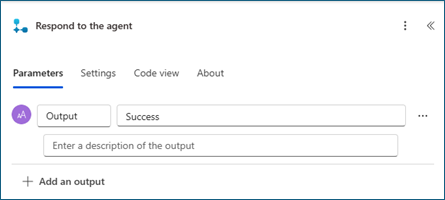
- Send a response back to the agent to confirm successful execution of the flow
- As a result, the Flow will look something like this
- Back in Copilot Studio, we finalize the agent by adding feedback to the user. We add a condition based on the response from the Flow. If Successful, it indicates a message to the user that the contact was added to the invite list.
- Save and publish topic
Part 4: Testing the Agent in Dynamics 365 Sales
Once everything is configured and published, it’s important to validate that the entire solution—from Copilot prompt to journey execution—is functioning correctly.- Open Dynamics 365 Sales Hub
- Navigate to Contacts
- Create a contact and add an email address you can check its inbox
- Launch the Copilot Panel
- Click on the Copilot icon on the right-hand side to open the Copilot sidecar
- Trigger the Agent with Natural Language
- Type a command such as:
- Press Enter to execute
- Select an Event
- Copilot will return a list of available events
- Select the appropriate event from the list
- Copilot Confirms Contact Added
- You’ll receive a success message like “Contact added to the event list.”
- Confirm Email Was Sent
- Go to the inbox of the test contact and confirm reception of the event invitation.
Conclusion
By following this step-by-step implementation, organizations can empower sellers to seamlessly initiate customer engagement journeys directly from the Dynamics 365 Sales interface using natural language prompts. This solution bridges the gap between sales execution and marketing automation, driving faster, more personalized communications while reducing operational friction.Key outcomes:- Accelerated time to engagement
- Reduced errors and manual handoffs
- Scalable, AI-assisted marketing triggers from sales interactions
Authors
This blog has been authored by Emanuel Caraza and Charles Odunukwe